Friday, October 26, 2012

Crayon/Notebook Holder

 I started my crayon holder by choosing three colors.  You can choose anywhere from 1-3 colors if you like.  I wanted mine to be colorful!  Start by cutting 2 - 6"x14" pieces, and 1 - 4"x16" piece.  If you want it to be taller, add about an inch on the two pieces to make it 7"x14".  (My original single piece I cut longer, just to make sure I had space but ended cutting it off at the end to make the 16").


Now, take your single piece (4x16) and hem what will be the top.
 

Next, sew your left side of your 4x16 piece to one of your 6x14 pieces.
 

Measure how big your want for your notebook, pin, and sew.

Next, you will do the same process for your crayon pockets.  (This is why you want this piece longer, so that you can have some give for the crayon).
 

I then sewed my final piece (wrong sides together) to the other, keeping the opposite side of the notebook open.


Hot glue the side to create a hem, and add two pieces of ribbon, then hot glue it all closed.
 

Voila... here is your crayon/notebook holder!


Saturday, October 20, 2012

Craft Nook

In our tiny little apartment, I haven't had any space for my crafts, sewing, etc.  I rearranged some things and decided to make a craft "nook".  It's better than nothing right?  So we took a trip to IKEA and got me some things to help organize.

Desk: $20
Desk extender: $14.99
Organizing baskets (which doubled as baskets, and I used the handles as ribbon holders): 4 @ $2.99/piece
Plastic bins for fabric and felt: 2 @ 4.99 a piece
Small storage containers: 2.99 for 100

I used the desk extender to hold my sewing machine so that I have open counter space.  I also found small plastic storage things to hold all of my buttons and little pieces.

I love how it turned out and I'm excited to have a space for myself!!


Friday, October 19, 2012

Trick or Treat Bag

I made a trick or treat bag to match my nephews costume that I made.  It, like the costume, was super easy.  I had so much felt left over that I figured, WHY NOT?


Tuesday, October 9, 2012

Angry Birds Costume Tutorial

Well, I've completed my first child's Halloween costume.  I am SO happy with how it turned out!  This is for my nephew, Joaquin, who LOVES Angry Birds.  He wanted to have the green angry bird.  So, between this picture...

And the tutorial here, I was able to put it together.  In the tutorial, I followed the directions for the black angry bird.  This costume will fit a child, size 6.

It was actually super easy and only took me a couple of hours to put together!

You will need these supplies:

1 yd. of green felt (70"-72" bolt)
1 yd. of matching cotton (I chose a lighter green color)
Sheets of felt in dark green, light green, black, white, & yellow
Matching thread
1 bag of pillow stuffing
Measuring Tool
Scissors
Hot Glue Gun
Sewing Machine

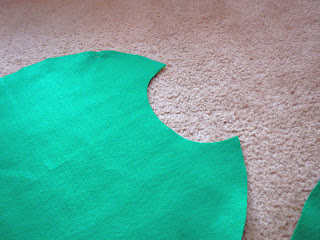
I started by cutting my felt into two pieces.  Then, take a single piece and fold it in quarters.  Measure 11" from the center (I originally measured 11.5" but scaled it back to 11").  It's easier as a guide to make a mark along each side, as well as from the center.


 Cut out your shape so you will unfold it to have a circle.


Do the same for your cotton pieces.  These will be the inside of the costume.
 

Next, you want to cut out the pieces for the face.  I didn't have a pattern for the pieces, I just eyeballed the picture and made my own.
 

Place them where you want them, and pin them in place.
 

Next you want to cut a whole for the neck.  I also just eyeballed this.  Make sure to have your felt piece and cotton piece together, so the whole is the same.


The next step is to sew your felt and cotton pieces together.  


Be sure to leave about a 6" space, to turn inside out, then stuff.


Once you've stuffed your piece, take your hot glue gun and glue the opening closed.
 

 Here is what they look like, after sewing and stuffing.  The next step is to glue all of your pieces on.


Ta da!!  And there you have your angry bird!  See, wasn't that easy?

The last step is to put them together but that step will come later, as I have to see where the arm holes need to go, and my nephew is up in New York.  But, I will just be sewing from the neck to the arm hole, then from the bottom of the arm hole, just down a few inches, leaving an opening for the legs.
 

Happy crafting!

Monday, October 1, 2012

DIY Play kitchen

After many challenges with spray paint, and trying to get these put together, I did it!  I wanted to make Sydney a kitchen because I didn't want to spend so much money on something that she may or may not play with.  So, my intention was to make this and see how it goes.

I started my project with an old bookshelf and an old nightstand.  I can't find my original pictures of the items.  But here is the finished project...


 For the fridge, I used cardboard to cover the front.  I used old IKEA handles that I had, that I never used for the handles.  I also included pictures on the fridge, and glued magnets on to give it a real effect.
 

For the counter, I used a wall decal to cover the cardboard.  I used CD's for the burners, a bowl for the sink, and constructed my own faucet out of cardboard.  All of this, I used Metallic spray paint for a "stainless steel" type look.


I made a curtain for a cover and there is a shelf on the inside to put plates, cups, food, etc.  
 

I LOVE how it turned out!!!!  My last thing that I need to do is put magnet on the fridge doors, so that they will stay closed.

Happy Crafting!

Saturday, September 29, 2012

Felt Letters & Draw String Bag

I saw a tutorial on Pinterest here, for DIY Alphabet out of fabric.  I have a TON of felt so I decided to adapt this project, to work for me.  Which is sorta what I do!

I started out with the font that I wanted (I chose the Hobo font, size 250), and printed all of the letters.  Eventually I want to do numbers 1-10 so I printed them as well.


 I cut them out, leaving the inside part (on some letters) to guide me when I cut the felt.


Like I said, I have a lot of felt, but mostly I have a TON of pink.  So I used pink for the back of every letter.  You will need to pieces per letter, totalling 52 pieces.


I used this craft bond spray glue.  It's easy, but make sure you are in a well ventilated area.  Just spray one piece, and attach the two pieces together.


Voila...


The last step is to take your stencils and cut out your felt pieces.  You could pin them if you want, but it was easier for me not to.  Here is how they turned out...


I felt inspired to make a bag to put them in.  SUPER EASY!  I took a 10x20 piece of felt and folded it in half, to make it a 10x10 bag.  I folded down the top, about an inch, and hot glued them down, put a ribbon through, and then hot glued the sides.  I added little flowers on the front but you could decorate it anyway you want.

TA DA.... DIY Alphabet and draw-string bag.


Monday, September 24, 2012

Personalized growth chart

The other day, I finished my ruler growth chart, and decided to personalize it today.  I went into Microsoft word, found a font that I liked (chunky fonts tend to work better), and put it together to make my stencil. 


 Now there are two ways to do this.

Option 1:
Take your stencil, and tape it onto the board.  If you have a ball tool, you can trace the letters, and it will make a mark on the wood, to be traced when you remove the paper.


Option 2:
This is the option that I chose.  Take an exacto knife, and cut out the letters.  Your stencil can then go directly onto the board.

 I chose to "color" my letters with a sharpie, but any type of paint would do the trick.

Here is the final product....

I love how it turned out!


$7 Halloween wreath

 Can you believe this only cost me $7?


Ok so I went to Target today, and was shocked to find this wreath, & the ghost BOO sign, in the dollar bin!!  I knew I couldn't find basic materials anywhere else for so cheap so I picked them up.  I also found the spider web for $2, and the ribbon on clearance for $3.  STEAL!!!!


The only other material you need is spiderwebs, which I didn't have so I used cotton balls.
 

I hot glued the "spiderwebs" all over the wreath, attached the spiderweb and BOO sign, and voila, you have a simple DIY Halloween wreath!!!  Only took me a half an hour to put together!

Can you believe we are talking Halloween already?  I sure can't!  Time is moving way too fast...

Saturday, September 22, 2012

Ruler Growth Chart

 I have been wanting to make one of these for such a long time!!!


I started with a 1x8x6 piece of wood from Home Depot.  I wanted a natural look so I got a natural stain, and painted 3 coates.  
 

I had ordered the vinyl from the Etsy shop, Abbie's House.  Find her vinyl here.  She can custom your vinyl for a specific color, but I went with black.


This was SUPER easy, and now we have an awesome growth chart!  I also want to personalize the growth chart by putting our names, or some cute saying, but I haven't gotten to that yet.

Happy crafting!